If you're an indie filmmaker looking for that piece of kit to fill your monitor/recorder needs, then it's worth taking a look at the Video Devices PIX-E5 5'' 4K Recording Video Monitor. It's small but powerful and would be at home on any indie film set, documentary, ENG or videographers gear bag. It can record up to 12-bit Pro Res 4444 XQ at 24fps DCI 4K (4096 x 2160) or 30fps UHD (3096 x 2160) both over HDMI. When you got some 4K Prores files from PIX-E5, you will be eagerly know the PIX-E5 4K video workflow. And this guide explores the best way to open and edit PIX-E5 4K Prores footage in Premiere Pro CC/CS6/CS5. Learn it now. As far as we know, the latest version Premiere Pro CS6, CC usually can handle 4K files without much problem, but it is extremely hardware intensive. On the other hand, it is a complete nightmare to import PIX-E5 4K ProRes to Premiere Pro - it cannot recognize ProRes codec, and even worse than that is Adobe Premiere Pro(CC) will import a .MOV file of any codec -Animation/ProRes, whatever doesn't matter. Can't find ProRes in Adobe Media Encoder (CS6) on Mac? No ProRes preset in PPro CC? To solve the problem, you need to convert PIX-E5 4K ProRes files to Premiere Pro editing-friendly format, like H.264 MOV. The process is surprisingly easy and can be done with Dimo Video Converter Ultimate for Mac. With it, you can effortlessly encode/re-encode PIX-E5 4K ProRes footage for smoothly importing and editing in various non-linear editing systems (NLE), including Adobe Premiere Pro, Avid Media Composer, Final Cut Pro, Davinci Resolve and more. Moreover, it can help you freely enjoy your 4K videos/movies, 4K YouTube clips, 4K camcorder recordings wherever you like, such as watching 4K movies (in any format) on 4K TV and even on mobile devices.If you work PIX-E5 4K files in Adobe Premiere Pro on Windows, please get Dimo Video Converter Ultimate. Below is the detailed guide on transcoding PIX-E5 4K ProRes files to Premiere Pro best editting codec.Free Download Dimo Video Converter Ultimate for Mac/Win:
 Other Download:
Transcoding PIX-E5 4K ProRes to Premiere Pro friendly formatsStep 1: Load PIX-E5 4K footageRun PIX-E5 4K Video Converter Mac and click "Add File" button, browse to the PIX-E5 4K ProRes footage and load them to the converter for conversion.
Other Download:
Transcoding PIX-E5 4K ProRes to Premiere Pro friendly formatsStep 1: Load PIX-E5 4K footageRun PIX-E5 4K Video Converter Mac and click "Add File" button, browse to the PIX-E5 4K ProRes footage and load them to the converter for conversion.  Step 2: Choose a proper output formatClick "Select Format" bar to choose output format. For transferring PIX-E5 4K to Premiere Pro, you are recommended to choose "Editor" -> "DNxHD 720P" or "DNxHD 1080P".Tip: Click the "Settings" button and set proper video/ audio parameters. You can reset set the video size, bitrate and fame rate. You can keep the original 4K resolution but also can adjust to 2K, 1080p video size just according to your needs. If you want to get original 4K resolution, just keep the video size as original.
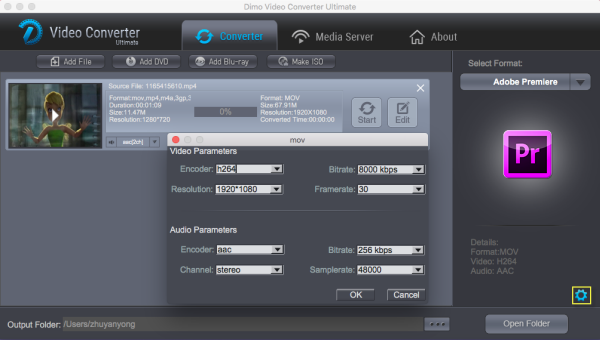 Step 3: Start converting PIX-E5 4K ProRes to H.264When you finish all settings, hit "Start" button to start transcoding PIX-E5 4K ProRes video for Premiere Pro on Mac. You can follow the conversion process from the pop-up windows. After the conversion, just click "Open" button to get the generated files and it would be easy to import PIX-E5 4K ProRes files into Premiere Pro CC/CS6/CS5/CS4 for natively editing.
 Free Download or Purchase Dimo Video Converter Ultimate for Mac/Win:
 Need the lifetime version to work on 2-4 Macs so that your friends and family can instantly broaden their entertainment options? Please refer to the family license here.
  Kindly Note:The price of Dimo Video Converter Ultimate for Mac is divided into 1 Year Subscription, Lifetime/Family/Business License: $43.95/Year; $45.95/lifetime license; $95.95/family license(2-4 Macs); $189.95/business pack(5-8 Macs). Get your needed one at purchase page.Contact us or leave a message at Facebook if you have any issues.Related Articles:
Source: How to Work PIX-E5 4K in Premiere Pro
Kindly Note:The price of Dimo Video Converter Ultimate for Mac is divided into 1 Year Subscription, Lifetime/Family/Business License: $43.95/Year; $45.95/lifetime license; $95.95/family license(2-4 Macs); $189.95/business pack(5-8 Macs). Get your needed one at purchase page.Contact us or leave a message at Facebook if you have any issues.Related Articles:
Source: How to Work PIX-E5 4K in Premiere Pro
MKV, short for Matroska Video, is commonly used for high-definition video files. It's increasing in popularity and will likely become the leading video container for HD videos. Nowadays, box-office movies are being increasingly delivered over the internet in MKV format. In case you want to get the wonderful songs from some MKV movies for playback on your MP3 players, here this article will show you how to convert MKV to MP3 easily and quickly.  Simplest Way to Convert MKV Videos to MP3 on Mac/Windows Converting MKV files to MP3 will be extremely easy with Dimo Video Converter Ultimate for Mac. With this smart video converter, you can extract songs from MKV files and save them as MP3 on macOS 10.12 Sierra, macOS 10.11 El Capitan, 10.10 Yosemite, 10.9 Mavericks, 10.8 Mountain Lion and 10.7 Lion. etc.. After the conversion, you will be able to enjoy those beautiful melodies on your iPod-like MP3 player wherever you go. Moreover, it allows you to trim to get the exact part you need and merge wanted segments together. P.S. If you want to exclude MP3 audio from MKV videos on Windows PC, Dimo Video Converter Ultimate is the smart choice which works as the best audio remover for Mac which works on Windows 8/7/XP/Vista. Now, download the MKV to MP3 converter software below and follow the tips to convert MKV for MP3 players. (Please download the right version according to your situation) Hot Search: MP4 to MP3 | WMV to MP3 | MOV to MP3 | 4K to MP3 | M4A to MP3 Free Download Dimo Video Converter Ultimate for Mac/Win:
 Other Download:
Steps to Convert MKV to MP3 on Mac (OS Sierra) or Windows (10) Step 1. Add MKV Files Install and run Dimo Video Converter Ultimate for Mac. After you launch the program, click "Add File" to open MKV files. Or click "Add File > Add Multi-files or Add Folder" to load multiple MKV files for batch conversion at one time.
Other Download:
Steps to Convert MKV to MP3 on Mac (OS Sierra) or Windows (10) Step 1. Add MKV Files Install and run Dimo Video Converter Ultimate for Mac. After you launch the program, click "Add File" to open MKV files. Or click "Add File > Add Multi-files or Add Folder" to load multiple MKV files for batch conversion at one time.  Step 2. Select MP3 as Your Output Format Go to "Select Format", you can see a list of supported formats. Now choose MP3 from "Format > Audio" as your required format. You can also customize video and audio encoding settings in "Settings".
  The MKV to MP3 Converter can extract audio track from your video files to all popular audio formats such as MP3, WAV, AAC, AC3, OGG, FLAC, M4R, etc. with perfect sound quality and high conversion speed. In addition, the program allows you to trim any part of the video to get the audio clips you need. Step 3. Start MKV to MP3 Conversion Before converting the videos, you can specify the destination folder in the bottom of the interface (optional). Click the "Start" button to start converting your MKV media files to MP3. Besides converting MKV to MP3, Dimo Video Converter Ultimate is also good at converting MKV to many other format, and vice versa. It also support share converted audio files to iPhone, iPod, iPad,Android phones and so on. Free Download or Purchase Dimo Video Converter Ultimate for Mac/Win:
 Need the lifetime version to work on 2-4 Macs so that your friends and family can instantly broaden their entertainment options? Please refer to the family license here. Kindly Note: The price of Dimo Video Converter Ultimate for Mac is divided into 1 Year Subscription, Lifetime/Family/Business License: $43.95/Year; $45.95/lifetime license; $95.95/family license(2-4 Macs); $189.95/business pack(5-8 Macs). Get your needed one at purchase page. Related Software: BDmate (Mac/Win) Lossless backup Blu-ray to MKV with all audio and subtitle tracks; Rip Blu-ray to multi-track MKV; Convert Blu-ray to almost all popular video/audio formats and devices; Copy Blu-ray to ISO/M2TS; Share digitized Blu-ray wirelessly. DVDmate (Mac/Win) A professional DVD ripping and editing tool with strong ability to remove DVD protection, transcode DVD to any video and audio format, and edit DVD to create personal movie. Contact us or leave a message at Facebook if you have any issues. Related Articles:
Source:Downscaling Yuneec Typhoon H 4K to 1080p for Editing/Playback on Mac
Need the lifetime version to work on 2-4 Macs so that your friends and family can instantly broaden their entertainment options? Please refer to the family license here. Kindly Note: The price of Dimo Video Converter Ultimate for Mac is divided into 1 Year Subscription, Lifetime/Family/Business License: $43.95/Year; $45.95/lifetime license; $95.95/family license(2-4 Macs); $189.95/business pack(5-8 Macs). Get your needed one at purchase page. Related Software: BDmate (Mac/Win) Lossless backup Blu-ray to MKV with all audio and subtitle tracks; Rip Blu-ray to multi-track MKV; Convert Blu-ray to almost all popular video/audio formats and devices; Copy Blu-ray to ISO/M2TS; Share digitized Blu-ray wirelessly. DVDmate (Mac/Win) A professional DVD ripping and editing tool with strong ability to remove DVD protection, transcode DVD to any video and audio format, and edit DVD to create personal movie. Contact us or leave a message at Facebook if you have any issues. Related Articles:
Source:Downscaling Yuneec Typhoon H 4K to 1080p for Editing/Playback on Mac
The Samsung Galaxy Tab S2 is drop dead sexy with its 2560 x 1600, 10.6, AMOLED screen; rich gold trim and faux titanium bronze dimpled back. Galaxy Tab S2's brilliant screen, plentiful storage capacity and slender build make it a great tablet for everyday use at home or on the go. However, you may be disappointed that you could not just play DVD discs on Galaxy Tab S2 directly, since there's no DVD drive with it.  In order to play DVD movies on play DVD on Galaxy Tab S2, you just need a DVD ripping tool, enable you to rip DVD disc into digital foramt which is playable on Galaxy Tab S2, such as MPEG4, H.264, H.263, WMV, DivX, Xvid, VC-1, etc. Although there are a lot of DVD rippers and converters on the market, here we'd like to recommend Dimo Video Converter Ultimate to you. Why we decided on it because, it not only would do what users need but because, it's really easy to use even for a novice. With this DVD ripping tool, you can fast rip and convert DVD movies to Galaxy Tab S2 playable format MP4 in its original quality with optimized video settings as easy as A, B, C. Besides, it can also help you rip videos from DVD playing on Samsung Galaxy S7/S7 Edge, Galaxy Note 4, Galaxy Note Pro, Galaxy Tab Pro, Galaxy Tab 4, Surface, Apple TV, iPad, iPhone, Kindle Fire HD, Xbox, Gear VR, PS VR, HTC Vive, Oculus Rift, etc. Plus, you can also select desired audio tracks for specific chapters; decide movie resolution, aspect ratio, bitrate and more. Awesome. For Mac users, please get DVD Ripper for Mac - Dimo Video Converter Ultimate for Mac. Below is the detailed guide on the DVD to Galaxy Tab S2 conversion process. Free Download Dimo Video Converter Ultimate (Win/Mac): Other Download:
How to Rip DVD for playing on Galaxy Tab S2 Easily Note that this guide uses Dimo Video Converter Ultimate screenshots to better describe how to finish ripping DVD to Galaxy Tab S2. The way to do this on Windows is the same. So just make sure you get the right version. 1. Load DVD files Insert your DVD disc to the DVD drive and run DVD Ripping software. Click the "Add DVD" button to add the DVD movies you want to rip. If you need to rip DVD with wanted audio track, you can click the drop down menu after "Audio" to select your desired tracks.
In order to play DVD movies on play DVD on Galaxy Tab S2, you just need a DVD ripping tool, enable you to rip DVD disc into digital foramt which is playable on Galaxy Tab S2, such as MPEG4, H.264, H.263, WMV, DivX, Xvid, VC-1, etc. Although there are a lot of DVD rippers and converters on the market, here we'd like to recommend Dimo Video Converter Ultimate to you. Why we decided on it because, it not only would do what users need but because, it's really easy to use even for a novice. With this DVD ripping tool, you can fast rip and convert DVD movies to Galaxy Tab S2 playable format MP4 in its original quality with optimized video settings as easy as A, B, C. Besides, it can also help you rip videos from DVD playing on Samsung Galaxy S7/S7 Edge, Galaxy Note 4, Galaxy Note Pro, Galaxy Tab Pro, Galaxy Tab 4, Surface, Apple TV, iPad, iPhone, Kindle Fire HD, Xbox, Gear VR, PS VR, HTC Vive, Oculus Rift, etc. Plus, you can also select desired audio tracks for specific chapters; decide movie resolution, aspect ratio, bitrate and more. Awesome. For Mac users, please get DVD Ripper for Mac - Dimo Video Converter Ultimate for Mac. Below is the detailed guide on the DVD to Galaxy Tab S2 conversion process. Free Download Dimo Video Converter Ultimate (Win/Mac): Other Download:
How to Rip DVD for playing on Galaxy Tab S2 Easily Note that this guide uses Dimo Video Converter Ultimate screenshots to better describe how to finish ripping DVD to Galaxy Tab S2. The way to do this on Windows is the same. So just make sure you get the right version. 1. Load DVD files Insert your DVD disc to the DVD drive and run DVD Ripping software. Click the "Add DVD" button to add the DVD movies you want to rip. If you need to rip DVD with wanted audio track, you can click the drop down menu after "Audio" to select your desired tracks.  2. Select output format Click the output format dropdown list; you'll get a lot of choices. For converting DVD to Galaxy Tab S2, you can select "Samsung > Galaxy Tab S2" as output format. By choosing Galaxy Tab S2, you'll convert your DVD movies to videos with optimized settings to fit Galaxy Tab S2 8.0 or 9.7. Or depends on your device, you can choose a suitable video format from catalogues. Tip: If you like, you can click "Settings" to change the video encoder, resolution, frame rate, etc. as you wish. Keep in mind that bitrate higher results in big file size, and lower visible quality loss, and vice versa.
  3. Start to rip After the above steps, you can go back to the main interface and hit the "Start" button to begin converting DVD to Galaxy Tab S2 compatible video format. When the conversion is completed, tap "Open" to located the ripped video files. connect Samsung Galaxy Tab S2 to PC and then drag and drop the converted files into the right folder of the memory card. Now start enjoying your beloved DVD movies on Galaxy Tab S2 8.0 or 9.7 anytime and anywhere you like! Mirror converted DVD movies from Galaxy to TV You just swipe your finger down from the top of the screen and press the Quick Connect button to start searching for nearby TVs on the same Wi-Fi network. Samsung says Quick Connect will work with any smart TV that is DLNA compatible. After you connect, you can mirror your Galaxy Tab S2's display on your TVs to display converted DVD movies. Or use Dimo's free media server to share converted movies to TV on large screen wirelessly. Free Download or Purchase Dimo Video Converter Ultimate:
 Need the lifetime version to work on 2-4 PCs so that your friends and family can instantly broaden their entertainment options? Please refer to the family license here. Kindly Note: The price of Dimo Video Converter Ultimate for Windows is divided into 1 Year Subscription, Lifetime/Family/Business License: $43.95/Year; $45.95/lifetime license; $95.95/family license(2-4 PCs); $189.95/business pack(5-8 PCs). Get your needed one at purchase page. Related Software: BDmate (Win/Mac) Lossless backup Blu-ray to MKV with all audio and subtitle tracks; Rip Blu-ray to multi-track MP4; ConvertBlu-ray to almost all popular video/audio formats and devices; Copy Blu-ray to ISO/M2TS; Share digitized Blu-ray wirelessly. DVDmate (Win/Mac) A professional DVD ripping and editing tool with strong ability to remove DVD protection, transcode DVD to any video and audio format, and edit DVD to create personal movie. Videomate (Win/Mac) An all-around video converter software program that enables you to convert various video and audio files to formats that are supported by most multimedia devices. 8K Player (Win/Mac) A mixture of free HD/4K video player, music player, Blu-ray/DVD player, video recorder and gif maker. Contact us or leave a message at Facebook if you have any issues. Related Articles:
Source: How to Rip/Convert Blu-ray to AVI Videos?
Need the lifetime version to work on 2-4 PCs so that your friends and family can instantly broaden their entertainment options? Please refer to the family license here. Kindly Note: The price of Dimo Video Converter Ultimate for Windows is divided into 1 Year Subscription, Lifetime/Family/Business License: $43.95/Year; $45.95/lifetime license; $95.95/family license(2-4 PCs); $189.95/business pack(5-8 PCs). Get your needed one at purchase page. Related Software: BDmate (Win/Mac) Lossless backup Blu-ray to MKV with all audio and subtitle tracks; Rip Blu-ray to multi-track MP4; ConvertBlu-ray to almost all popular video/audio formats and devices; Copy Blu-ray to ISO/M2TS; Share digitized Blu-ray wirelessly. DVDmate (Win/Mac) A professional DVD ripping and editing tool with strong ability to remove DVD protection, transcode DVD to any video and audio format, and edit DVD to create personal movie. Videomate (Win/Mac) An all-around video converter software program that enables you to convert various video and audio files to formats that are supported by most multimedia devices. 8K Player (Win/Mac) A mixture of free HD/4K video player, music player, Blu-ray/DVD player, video recorder and gif maker. Contact us or leave a message at Facebook if you have any issues. Related Articles:
Source: How to Rip/Convert Blu-ray to AVI Videos?
As 4K-resolution cameras falling into consumers' hands, such as BlackMagic Design Production Camera, Leica D-LUX, Panasonic LUMIX DMC-GH4K/FZ1000, Sony Alpha a7S, GoPro Hero4 Black, Canon EOS 1D-C, etc. In this situation, if you recorded some 4K videos with your 4K camcorder, you may prefer to edit them before sharing with friends or uploading to YouTube or 4K TV. Then the question arises. Will editing programs like Premiere Pro CC support 4K videos?  Granted, Premiere Pro CC 7 (2017 included), CS6 can handle (usually) 4K files without much problem, but it is extremely hardware intensive. You probably don't like to invest a new computer, that means dead end? Humh, of course not, but you do need to transcode 4K video to Premiere Pro using MPEG-2 (1080p) as primary delivery format. Here we will discuss how to edit 4K footage with Premiere Pro without bogging down your computer. How to import and edit 4K video in Premerie Pro CC successfully? To get a best solution for 4K video and finish the 4K video conversion task, the best Mac 4K video converter app, Dimo Video Converter Ultimate for Mac, is your best choice to transcode DJI, Nikon, Sony, Blackmagic, GoPro, Panasonic, Canon 4K video to Premerie Pro CC codec. With it, you can effortlessly transcode transcode 4K video, H.264(MP4), XAVC, XAVC S, etc footage to MPEG-2 for Premiere Pro. What's more, it supports converting 4K files to various non-linear editing systems (NLE), including Avid Media Composer, Final Cut Pro, Camtasia Studio and more. If you work 4K files in Adobe Premiere Pro on Windows PC, please get Dimo Video Converter Ultimate to solve the issues. Free Download Dimo Video Converter Ultimate for Mac/Win: Other Download:
Convert 4K video files for Adobe Premiere Pro CS6/CC/CS6/CS5/CS4 Step 1. Load 4K Files Run the program you just install, and drag and drop the 4K video files to the 4K converter. You can also hit "Add File" button to import videos to the app. Step 2. Choose output format Click "Select Format" bar and choose "Format" > "Editor" > "Adobe Premiere" as output format for editing 4K in Adobe with natively supported video codec.
Granted, Premiere Pro CC 7 (2017 included), CS6 can handle (usually) 4K files without much problem, but it is extremely hardware intensive. You probably don't like to invest a new computer, that means dead end? Humh, of course not, but you do need to transcode 4K video to Premiere Pro using MPEG-2 (1080p) as primary delivery format. Here we will discuss how to edit 4K footage with Premiere Pro without bogging down your computer. How to import and edit 4K video in Premerie Pro CC successfully? To get a best solution for 4K video and finish the 4K video conversion task, the best Mac 4K video converter app, Dimo Video Converter Ultimate for Mac, is your best choice to transcode DJI, Nikon, Sony, Blackmagic, GoPro, Panasonic, Canon 4K video to Premerie Pro CC codec. With it, you can effortlessly transcode transcode 4K video, H.264(MP4), XAVC, XAVC S, etc footage to MPEG-2 for Premiere Pro. What's more, it supports converting 4K files to various non-linear editing systems (NLE), including Avid Media Composer, Final Cut Pro, Camtasia Studio and more. If you work 4K files in Adobe Premiere Pro on Windows PC, please get Dimo Video Converter Ultimate to solve the issues. Free Download Dimo Video Converter Ultimate for Mac/Win: Other Download:
Convert 4K video files for Adobe Premiere Pro CS6/CC/CS6/CS5/CS4 Step 1. Load 4K Files Run the program you just install, and drag and drop the 4K video files to the 4K converter. You can also hit "Add File" button to import videos to the app. Step 2. Choose output format Click "Select Format" bar and choose "Format" > "Editor" > "Adobe Premiere" as output format for editing 4K in Adobe with natively supported video codec.  Tips: Click "Setting" button if you'd like to customize advanced audio and video parameters like Video Codec, aspect ratio, bit rate, frame rate, Audio codec, sample rate, audio channels. However, please keep it default as original if you want to get original 4K resolution. Step 3. Start converting 4K files Tab the "Start" button of this fastest 4K Video Converter. It will start to transcode 4K for importing to Adobe Premiere Pro immediately. Soon after the conversion, just click "Open" button to get the generated files for natively editing in Premiere Pro CC 2017 as well as CC7/CS6/CS5/CS4/CS3 perfectly. Other tips to get best Premiere Pro CC Settings: 1. Disable High-Quality Playback, gets you apx. 5-10% performance (Player Window/Wrench Icon/High Qaulity Playback). INFO: Mercury Engine Transmit to second monitor, takes away apx. 5-10% performance (Player Window/Wrench Icon/Enable Transmit). 2. RedCode/Cineform movie files: Set playback resolution to 1/2 or 1/4 size will increase performace apx. 10-20% (Player Window/Full-1/2-1/4,etc.) 3. Increase Playback Preroll and Postroll time to 3-8 seconds for smoother playback, especially with slower harddrives (Edit/Preferences/Playback/Preroll-Postroll). 4. Disable Lumetri Scopes if not needed. They have been optimized in PP 2015.3 but you loose 3-8% performance when enabled (Window/Lumetri Scopes). Free Download or Purchase Dimo Video Converter Ultimate for Mac: Contact us or leave a message at Facebook if you have any issues of importing 4K to Premiere Pro CC. More Articles:
Source:How to Rip 3D Blu-ray for Viewing on Zeiss VR One
Tips: Click "Setting" button if you'd like to customize advanced audio and video parameters like Video Codec, aspect ratio, bit rate, frame rate, Audio codec, sample rate, audio channels. However, please keep it default as original if you want to get original 4K resolution. Step 3. Start converting 4K files Tab the "Start" button of this fastest 4K Video Converter. It will start to transcode 4K for importing to Adobe Premiere Pro immediately. Soon after the conversion, just click "Open" button to get the generated files for natively editing in Premiere Pro CC 2017 as well as CC7/CS6/CS5/CS4/CS3 perfectly. Other tips to get best Premiere Pro CC Settings: 1. Disable High-Quality Playback, gets you apx. 5-10% performance (Player Window/Wrench Icon/High Qaulity Playback). INFO: Mercury Engine Transmit to second monitor, takes away apx. 5-10% performance (Player Window/Wrench Icon/Enable Transmit). 2. RedCode/Cineform movie files: Set playback resolution to 1/2 or 1/4 size will increase performace apx. 10-20% (Player Window/Full-1/2-1/4,etc.) 3. Increase Playback Preroll and Postroll time to 3-8 seconds for smoother playback, especially with slower harddrives (Edit/Preferences/Playback/Preroll-Postroll). 4. Disable Lumetri Scopes if not needed. They have been optimized in PP 2015.3 but you loose 3-8% performance when enabled (Window/Lumetri Scopes). Free Download or Purchase Dimo Video Converter Ultimate for Mac: Contact us or leave a message at Facebook if you have any issues of importing 4K to Premiere Pro CC. More Articles:
Source:How to Rip 3D Blu-ray for Viewing on Zeiss VR One